Thyristors Online | High-Quality Power Semiconductors

** Understanding Disc Type Thyristors: A Practical Setup Walkthrough **.
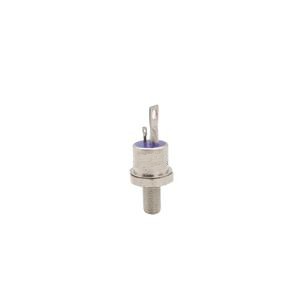
(Installation Guide for Disc Type Thyristors)
Disc kind thyristors are the peaceful heroes of power systems. These little devices handle high voltages and currents like champs, functioning as switches to control power circulation. Yet also heroes need proper configuration. Allow’s break down how to install them right– no lingo, no fluff.
Initially, think security. These components deal with serious power. Constantly use shielded handwear covers and safety and security goggles. Ascertain your work space. Make sure there’s no water, dirt, or anything flammable nearby. If your devices are harmed or your office is untidy, fix that initially.
Next, gather your gear. You’ll require the thyristor itself, a heatsink, installing hardware (bolts, washing machines), thermal paste, a torque wrench, and standard devices like screwdrivers. Inspect the thyristor’s specifications– voltage, existing, gate trigger needs. Suit the heatsink’s dimension to the thyristor’s power demands. Mixing components from different brand names? Don’t. Stay with one vendor to prevent shocks.
Clean every little thing. Dirt or grease on the thyristor or heatsink? Clean it off with isopropyl alcohol. Unclean surfaces trap heat, and warm eliminates electronic devices. Apply thermal paste thinly on the thyristor’s base. Too much paste acts like a blanket, keeping warm in. Spread it uniformly– no chunks.
Placing time. Area the thyristor on the heatsink, aligning the openings. Slide in the bolts with washers, but don’t tighten yet. Utilize the torque wrench to protect them in a crisscross pattern. This spreads pressure equally. Examine the guidebook for torque specs– over-tightening splits the disc, under-tightening reasons voids. Both are bad.
Check for arrows or markings on the thyristor. These reveal the ideal instructions. Installing it backwards? It will not function, and you may fry it. Align the primary terminals (anode and cathode) with your circuit’s layout. The gate terminal? That’s your control switch. Connect it very carefully to stay clear of signal sound.
Circuitry comes next. Usage thick wires for high-current courses. Slim wires overheat. Kink terminals securely– loose connections trigger and thaw things. For the gate, shielded cords help obstruct disturbance. Maintain gate cords away from high-voltage line. Twisting them together? Not a good idea.
Examination prior to complete power. Use a multimeter to examine resistance in between anode and cathode. A low analysis might suggest a brief. Examine eviction with a small pulse– does the thyristor turn on? If of course, you’re golden. No? Recheck links and polarity.
Look for heat. After powering up, let the system run briefly. Touch the heatsink (thoroughly!). Too warm? Check the thermal paste, torque, or air movement. Thyristors can manage warm, however just up to a factor.
Troubleshooting ideas: If the thyristor will not activate, examine the gate signal’s voltage and pulse size. Weak signals will not kick it into activity. Overheating? Possibly the heatsink’s also tiny or air movement’s blocked. Unsteady procedure? Try to find loosened bolts or unclean get in touches with.

(Installation Guide for Disc Type Thyristors)
Remember, disc type thyristors aren’t plug-and-play. Take your time. Follow each action like it’s one of the most important one. Skip absolutely nothing. A well-installed thyristor in 2014. A hurried work? That’s a ticking time bomb.